Adding a Follow-up Action
A follow-up is a file-related action taken after a file has been submitted. Examples of follow-ups include investigative notes, meetings with different parties, consultation with patient family. In RL6, you can document follow-ups in a file using any of the seven different follow-up types. They may only be added using the Add Follow-up button and will appear as content stored in the Follow-ups grid. All follow-up types have areas where circumstances, descriptions and attachments can be entered. You can create and assign tasks directly related to a follow-up entry. Some follow-up types have additional sections for Physician Comments and Root Cause Analysis details.
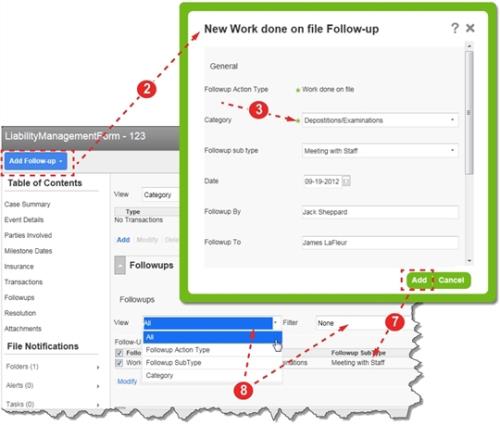
Follow-ups are usually added in the Management form (i.e. after a file is submitted) but they can also be added to a Submission form (i.e. before a file is submitted) if the system is configured to allow this function.
To add a follow-up:
- Open a file.
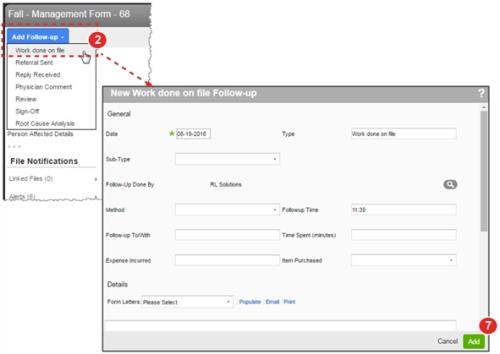
- Click the Add Follow-up button and click the type of follow up you would like to add. In this example, the Work Done on File follow-up is shown.
- Note: (For RL6:Risk and RL6:Feedback only) Money Spent and Items Purchased fields appear for first three follow-up types.
- Ensure the mandatory fields are completed.
- Complete the other fields, as appropriate:
- To complete the Details section, you may select a Form Letter from the drop-down list and click Populate.
- Use the Email link to send the follow up details and file attachments to an email recipient.
- Use the Print link to display the print
- Add an attachment, if desired (not shown) (Adding an Attachment to a Form).
- Add a task, if desired (not shown) (Adding Tasks to a Follow-up).
- Click Add. A new line appears in the Follow-ups grid and the entire file is saved automatically.
- Note: If you are adding a follow-up to an incomplete file, click OK. The follow-up entry is added and you can continue working on the file and save when you are ready.
- (This step only applies to RL6:Claims) If desired, used the View and Filter lists to reduce the number of follow-ups shown in the grid.
- Note: Check the box next to a follow-up to activate the Edit and Delete links below the grid. Click Edit to view the full details or Delete to remove it from the file.
RL6:Risk:
:
RL6:Claims: